Wicks help our candles glow, setting the mood in a dimly lit room while dispersing fragrance into the air. Wicks deliver fuel to the flame by pulling the melted wax up from the candle. There are hundreds of different types and sizes of wicks that can be used. It can be mind boggling…
Wicks Control the Candles
It is always important to choose an appropriate type and size of wick for a candle. Multiple factors go into picking the perfect wick. First, the wax type – different waxes need different wicks. Second, the size and shape of the container. Smaller sizes require a thinner wick and larger sizes may require multiple wicks. Third, the color and fragrance used have an impact on your wick construction, size and treatment. Scared yet? Don’t be. Without the proper wick, nothing matters.
Any reputable candle manufacturer will take extreme care in choosing a wick that’s the appropriate size, shape and material to meet all the proper burn requirements for a particular candle formula.
We personally test multiple types of wicks to determine what is going to give us the best results in our hand poured soy wax candles. Sometimes you’re lucky and wick selection is achieved quickly. Other times, it takes weeks of trial, testing, error and do-overs to get the perfect flame height, burn time and cleanliness. Don’t give up, the journey is worth it!
Pick the Right Wick
Picking the wrong size or type of wick can cause a candle flame to flare or put out smoke and soot because too much fuel (wax) is being used too quickly. On the flip side, using a too-small wick will not pull up melted wax fast enough, causing your flame to extinguish itself mid-burn (which is a bummer.)
Once you have determined the size of the candle, the amount of fragrance, and the shape of your vessel, the fun part begins.
From experience, we select a few wicks from our library that we think will work. We’ll do a burn test on 5 to 6 types of wicks per fragrance until we get it right. We want a good quality burn, which is clean from soot, smoke and blooming, full use of the wax, controlled flame height, and a long burn time.
Remember that not all fragrances will be successful with the wick you may have used on a previous fragrance. So, don’t get lazy – stay with the testing until it burns perfectly.
It sounds like a lot of work, and it is, however the payoff is euphoric. The last thing you want is the candle to burn dirty or fizzle out before you or someone else has even had a chance to enjoy it.
Which Wick?
Wicks come in several types: wooden, square, flat, corded and specialty.
We have customers that ask about wooden wicks because they LOVE the look and sound. In my opinion, the aesthetic is nice but the burn is underwhelming. And the debris muddies the wax pool giving the candle a sloppy look.
Our wick of choice is a natural cotton, lead-free wick. Which one you ask? Remember that all depends on multiple factors for each candle and fragrance.
Once we have done all of our burn testing and are satisfied with the results, it is time to produce, package and sell for someone to enjoy.
Tips for Candle Care
Another thing I would to touch on is the proper care and maintenance of the final product. If you’re like me, I enjoy a good candle to help ease a stressful day or just enhance the mood in a particular room. I also savor the ritual of unboxing a candle and placing it somewhere prominent to be enjoyed.
 Tip 1: Make sure you trim the wick to 1/4 inch each time before burning. Have you ever had a favorite candle just burn down the middle, leaving you frustrated or disappointed? Listen up!
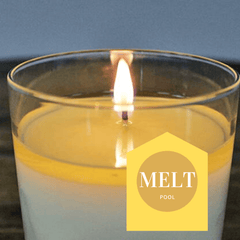
 Tip 2: (This is IMPORTANT!) The first burn of your candle is the most critical! It should be kept burning long enough to create a melt pool that extends to the edges of the glass container. This rule of thumb should be used for ANY container candle. Always remember, wax has a memory, any time less than stated may result in the candle 'tunneling' or burning down the center, resulting in unused wax which is wasteful and expensive.
Tip 3: Don’t burn too long. Our filled-glass candles are designed to burn no more than 2-3 hours at a time. This burn time should be adequate for achieving the desired melt pool.
 Tip 4: Trim the wick before, after (and sometimes during) a burn. If your wick starts to smoke, it may be necessary to extinguish the candle and trim the wick again. You may also notice some wicks look like they have a mushroom on the end. This is called a bloom and should be removed.
Tip 5: Your wax pool should be kept clear of any wick trimmings, matches or any other debris at all times to provide a safe and clean experience.
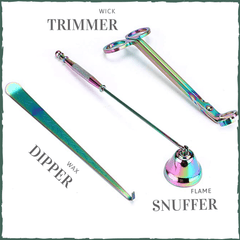
 Tip 6: Don’t blow or wet out. To extinguish the candle, use a candle snuffer or lid to prevent hot wax from splattering. Never use water to extinguish your candle. There are several candle care tools available. I highly recommend using them.
 Finding the right wick will always be satisfying when you see the fruits of your labor - your perfectly burning candle. Remember, don’t take shortcuts, follow all the safety guidelines (and the science) that goes into producing something that brings joy. Happy wicking!
Visit our Candle Care and Use page for more information.
#acdcco #acdccandles #aestheticcontent #creativernacular #candlecare #candleburning #candles #candletips #candletip #candleburning #candleaddict #candlelover #candlelovers #candleobsessed #lovecandles #candlelight #soywaxcandles #candlelover #scentedcandles #soycandles #candlemaker #cleanburningcandles #candlemaker #candle #themoreyouknow #goodtoknow
Leave a comment